I decided to post a tutorial for making origami cranes to encourage others to participate in the 1000 Cranes for Japan project. You can see the original post in my blog How The Sun Rose, found here:
1000 Cranes for Japan. Follow this link to see how we incorporated cranes with our spring nature table: :
Spring Nature Table. Begin with a square piece of paper - scrapbook paper works great. With the wrong side up, fold the paper in half and half again, then fold at the corners in half, open and do it again at the opposite corners.

At a corner fold the sides to the center mark, open and repeat for each corner.

When you open your paper, your folds should like this.

Next, fold in the areas that I shaded green.

When you do the first two opposing sides it will look like this.

When you fold all 4 centers in, it will look like this.

Pull all 4 corners together...

and crease in 2 opposing center lines so it looks like the photo below:

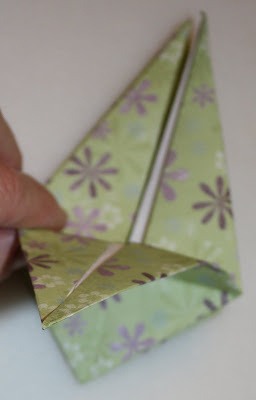
Now take one of the flaps and fold it over & do the same to the opposite flap.

Take the tip of the flap facing you and fold it down. Also fold down the flap on the other side.
It will look like the photo below:


See the points on the left and the right side? Fold them together. Turn the crane over and fold those 2 points together so it looks like the photo below: (Now you have wings, head & tail)


Pull the neck and tail part way down so it looks like the photo below:


Pull up the wings

Curl the wings down and turn down one end to make a face.
Now you have a crane!

If you hold under the tail and pull at the neck, the wings will flap.
 At a corner fold the sides to the center mark, open and repeat for each corner.
  When you open your paper, your folds should like this.
  Next, fold in the areas that I shaded green.
  When you do the first two opposing sides it will look like this.
  When you fold all 4 centers in, it will look like this.
  Pull all 4 corners together...


Thanks for helping Japan.
ReplyDeleteJust wanted to let you know that you are missing one fold between picture 11 & 12.
Then you will have square back. Please see
http://www.omocha-album.com/sample/origami-s/turu.html
This comment has been removed by the author.
ReplyDeletegreat tutorial! thanks!
ReplyDelete